![]() Allplan FT
Allplan FT
![]() New
User's Survival Guide
New
User's Survival Guide
updated
February 2002
 How do I plot a drawing! - This assumes you have worked out how
to use plot layout to 'assemble' drawing from the component drawing
files. Not
all CAD packages work like this - my old favourite 'Drawing Express'
for one.
How do I plot a drawing! - This assumes you have worked out how
to use plot layout to 'assemble' drawing from the component drawing
files. Not
all CAD packages work like this - my old favourite 'Drawing Express'
for one.
Clicking on the 'Print' command in Allplan is OK for quick check prints (it seems to automatically find my A4 printer on the network see update at foot of page) but for proper (i.e. A1 or whatever, in Europe ) plotting you need to use the following method:
- while in the Layout Editor - 'Create ->Plot Layout->Plot Layouts'. This gives a tabbed dialogue as below:
Click the green tick mark to OK the settings and again in the previous tabbed dialogue whereupon a pop-up will appear asking if you wish to start printing now? If your plotter is connected up and ready click Yes and that's it. There may be a simpler way to plot but I have not found it yet!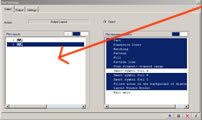
Ignore the r.h. window for the moment. The left window lists Layout sets you have created - there should be at least one. You access the list from the same button used for regular drawing filelists but while in the Layout Editor.
Note that you can select multiple drawings to plot in sequence - a time-saving feature.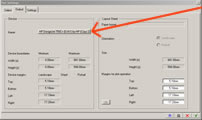
This second tab allows access to the plotter or printer set up via the wide button at middle top left. Use this to select your plotter and set all it's attributes to your liking. 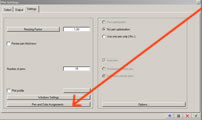
The third tab is very important. Don't touch anything except the button at the bottom marked 'Pen and Color Assignments'. Click this and you get the next dialogue... 
Click on all the r.h. column of colours one by one and set them to black. This way all lines will plot in black whether you have set color/pen association to ON (recommended) or not, within the Show/Hide command back up in the top of screen toolbar under 'View'
Update February 2002 - I find it is also a good idea to set most pen sizes to .25 unless you have a specific requirement for a pen colour. This way you can use all the available colours for modelling without fear of plotting the 2D drawings with unexpected line widths. For fine lines I go down to a .13 pen - in some plotters in draft mode this is better set at .18 minimum.
Note also that every time you install a new printer or plotter to Windows the default pen colours will reassert themselves and you will have to repeat the above process.
In my old HP 750C+ you could do fast draft prints by setting the driver properties to 'draft' and the color option to 'greyscale' - without the greyscale option set it would revert to 'normal' if there were any colour fills on the drawing.
In my new HP 500 you can just set the driver to 'draft' and it does colour in draft mode as well - a big improvement.
There is a 'print' command available from the File menu. To print to scale set the zoom scale (there is a little drop down list box at the top of each window) to 1:50 or whatever you want, use the arrow keys to move the screen view around to centre on what you want to print, then click 'File->Print', choose the bottom option of 'Print setup' from the little box that appears, here set up 'Print to Scale' or 'Fit to page' as you wish, then click 'Print' back in the little dialogue box, set your printer choice and properties here - NOT in the little dialogue box middle option of 'Print setup' as the settings do not seem to 'stick'.
Thereafter Allplan should remember your last settings and you can just select 'Print' in the future.