| Allplan
FT
user pages Scanning in paper drawings... for vectorisation or using as bitmap symbols - also plotting colour images Return to Allplan FT Users Main Page |
|
|
|
First make sure you have a licence that includes the Scan Module - the icon looks like this on the Cad Navigator (Ctrl+Q).
Scanner
For information I use an A3 Epson GT 10000+ scanner (SCSI of course!) but also purchased the excellent Silverfast scanning software from Lasersoft AG.
While I upgraded to version 11 of CorelDraw and Photopaint recently I now prefer to use Photoshop v 7. I discovered that you can adjust the grayscale scan in Photoshop by using an Adjustment Layer and the 'Threshold' option.
Before scanning
Old drawings will often have pencil and pen lines, old notes, coffee stains and all manner of damage - a bit of 'ironing out' is worth it if the original is not completely flat. (Note that there are tools within the Scan Module of Allplan for 'tweaking' scan images after import if they are distorted - see the Allplan Scan Module online Help for more information.)
Scan into bitmap editing package in grayscale
Scan the original drawing in '8-bit grayscale' and not 'line-art' (i.e. black & white or '1-bit') setting;
(The reason for this will be explained later - essentially it picks up more detail - if you have a very clean original image on a high contrast background by all means try 'line art' straight off)
Try to get the paper about straight but do not worry if it is slightly - or very - skewed;
Set the resolution at 150 dpi - or other fairly low resolution; (I find this a good balance between detail and file size - for a lot of very fine detail or where you want to incorporate the scan as part of the final drawing itself, you might want to 'up' the resolution a bit to 300 dpi)
I scan directly in to Corel Photopaint 9 (Update June 2003 now prefer Photoshop 7.1) - but any 'paint' or bitmap editing package will do;
Save out of the package in 'tif' format (uncompressed if there is an option);
Repeat as many times as you require to cover all the original drawing in A4 chunks or whatever paper size your scanner can manage. It is best to be methodical at the risk of scanning too much blank paper than lose track of what you have and have not scanned.Import into Layout package (or leave in bitmap editor)
I import my scans saved as tif files into Coreldraw 9 (Update May 2003 Coreldraw v11 not as good at this for some reason) and manipulate them there;
(This is purely a personal preference because I happen to have Coreldraw 9 and it turns out to be excellent at this sort of thing - I would bet that Illustrator™ and many other packages including Photoshop™ type packages would also be able to handle this as well - my only concern is that rotating images back and forth in a bitmap editing package seems to rapidly degrade the quality of the scan)
Update 28 June 2002 - well, well... I buy Photoshop 7 and guess what?... it does not have this feature of Corel Photopaint for controlling the conversion from greyscale to B&W! - so maybe it is just a Photopaint feature - it is certainly very useful.
Update December 2002 - finally worked this out - use an Adjustment Layer and 'Threshold'.
Coreldraw 9/10/11 has good tools for batch importing - i.e. you can mark all the 'tif' files in the Import File window in one operation and it will prompt you to place each one on the sheet in turn - note that I always set up a paper size onscreen at least as big as the original drawing;
Re-assemble original drawing (stick your scans together)
Coreldraw 9/10/11 allows rotating of images in custom amounts - usually a few degress or fractions thereof are all that is required - you would be surprised how near straight you can line up drawings on the platten without trying too hard; make sure that you turn off anti-aliasing and keep original proportions during all rotations - I usually pull down a 'guide line' from Coreldraw to check horizontality and verticality and then try a rotation of one or two degrees - if too much or too little use 'Undo' to revert to the original and try a different rotation value - avoid multiple rotations as this will degrade the quality of the scan.
A particular feature of Coreldraw 9 is that if you zoom in really close and grab one image and then very slowly start to drag the image it becomes transparent automatically thus allowing accurate placement over other scanned sections of the original drawing. Other packages probably offer similar tools. In this way I find I can scan in and recreate a very accurate copy of the original printed paper drawing.
Update 28 June 2002 - would you believe it - this feature no longer works in CorelDraw 11 !!
Export drawing
Finally I export from Coreldraw again as a tif at 150 or 300 dpi and uncompressed;(note the resolution figure for later!)
Floyd who?...
Reload this image into Photopaint (for Photoshop v7, import and use the Threshold command in an adjustment layer)
Change the 'Mode' of the image to 1-bit Black & White - in Photopaint the 'Mode' command is under 'Image' - but it will vary from package to package - here it brings up a dialogue offering the default option of 'Halftone'. This is useless for fine detail. In Photopaint there is a drop-down box in this dialogue offering different methods of conversion - my personal favourite is 'Floyd-Steinberg' - partly for the name and partly because it seems to offer the best control over detail. If you activate the preview windows in Photopaint you can drag around the image to check the fine detail areas and also move the slider up and down to control the density of the dots that the image will be converted to. Once a good compromise has been chosen OK out of the dialogue and 'save as' the image (remember where you saved it!).Bring into Allplan FT
Open a project and a blank drawing file in Allplan.
Right click (in v16.2) in the workspace and choose 'Insert Image' (or go the long route via switching to the Scan Module).
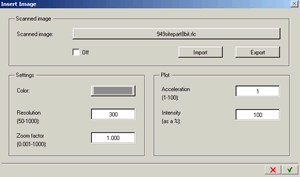
Click 'Import' in the resulting dialogue, ignore the project directory that Allplan offers you by default and browse to wherever you have stored the final image described above. Note that you will have to change the 'drop-down box' entry in this dialogue from 'RLC' format to 'TIF' files (other formats are now also supported you will notice).
Find the image file and click 'Open' which closes that dialogue box and immediately opens another similar one called 'Destination Image' which offers the same filename but with a 'RLC' file extension.
Unless you want to change the filename click 'Save' and then accept the offered 'brightness value' default of 50 and the file is converted and saved in the project directory.
Unfortunately Allplan has to convert all files to RLC format - a 1-bit monochrome format made up of lines rather than dots - to use them in the background to draw over - hence the need to carefully do your own conversion to 1-bit black and white beforehand or a lot of detail will probably be lost from the scanned image here.
...
You should at this stage have the 'Insert image' dialogue box still on screen with the name of your imported file in the sort of long button thing at the top. The only option to check is 'Resolution' as Allplan always seem to offer '300'. If you look back in these notes you will see that we exported out of Coreldraw at '150 dpi'. Therefore to scale correctly enter '150' here instead of the default value.
[Update 17.10.2001 - I am not sure of this but it often seems to work best if you leave the default '300' setting and try that first... for no logical reason that often works first time!]
[Update 24.10.2001 - still getting unpredictable results - it could be something to do with the scale of the original drawing - as a last resort you can 'resize' the original using the scaling tool within Allplan Scan Module to force the image to correct scale or if vectorising into a new drawing you could ignore the bitmap scale and scale up the vectors once traced. ]
Click the Green Tick('OK' in v2003) button and your scanned image will appear.
Issues...
I usually find that the imported image is rotated 90 degrees (this only seems to affect tif format files) and so use the Scan Module tools to rotate it back (-90 deg = clockwise) to the orientation before importing. (Note that these tools are quite powerful - any deletions or alterations affect the original of the 'RLC' image in the project directory. Note that there is a Copy Image command available - it does not copy the current image but offers a copy from and then a copy to filelist dialog, so you can use it to copy any image - I would recommend this in preference to using Windows Explorer to duplicate image files)
Update June 2003 - in Allplan 2003 they have fixed the tif rotation bug! But unfortunately seem to have introduced another which causes Allplan to crash during conversion of the tif to rlc format. The workaround is to save the final 1-bit file to be converted to rlc in jpg format rather than tif. This also has the advantage of keeping down the file sizes.
To trace over the image switch to another empty drawing file, set it to 'Active' and set the drawing file linked to the bitmap image to 'reference mode'. Allplan will warn you if you try to set it to 'edit' mode but will not prevent you from doing it if you really want to (?).
Check with the measure tool that the scan is correct in scale (the scale shown at the bottom of the screen does not matter - the measure tool should be correct whatever scale you are working in).
If the measure tool is reporting incorrect sizes compared to the original drawing then it is probably because the import 'Resolution' setting is wrong. Make Active the drawing file where you originally imported the scan.
Use the 'Clear Link' tool from the scan module to unlink the drawing file from the bitmap.
Then click the 'Insert Image' button again as from the start of these notes and 'Import' from the resulting dialogue - the resulting file open box will still contain your scan in 'RLC' format - select that and you will come back to the 'Insert Image' dialogue where you can alter the 'Resolution' setting. If '150' was out by a factor of say 2, then leave it at '300' or try '75' - you get the general idea.
For imperial measurements some creative calculations will be needed to get it to come in correctly at metric scales. Note that you cannot count on the input box for 'Resolution' to calculate formulae - it accepts a calculation but will not compute it correctly in my experience - best to do it first and then enter the value.
To trace or leave as bitmap?...
There are no hard and fast rules here - for tracing I sometimes use the 3D wall tools with a shading setting to the wall so that it is readily visible.
To see the walls over the bitmap you need to enable 'Scanned images on top' from within the 'Show/Hide' tool. You can later do a wireframe export of the plan to make everything 2D if you wish (but 'turn off' the bitmap image in the background first or it seems to cause problems - if you have forgotten to put the vectors - i.e. the new lines drawn over the bitmap - in a separate drawing file from the one containing the bitmap - or more correctly the link to the bitmap - then unselect the 'Show/Hide' tool option 'Scan element/ scanned image' to switch it off temporarily). See 'Tips & Tricks' page 4 for a further note on this.
Tools such as 'Modify Offset' are invaluable for 'tweaking' wall thicknesses - also
'Fold Line' for 'pulling' bits of non-straight or uneven thickness walls into position.
'Derive Circle' is just one example which has within the one tool so many labour saving features you need to try it to appreciate it. (Have a look at the '2D techniques page')
This is always supposing you want to create a new vector drawing from the old. On several jobs I have just left the bitmap in the background and drawn new vectors over it. The bitmap editing tools in the Scan Module allow you to cut, copy, paste and reshape the bitmap also.
And if that wasn't enough you can save bits of bitmap as 'bitmap elements' for future use.
'Get from Library' to bring in bitmap elements which can be color and not just B&W (apparently - I have not got round to trying this out yet!)
Update February 2003 - I have just noticed that in v17 Allplan bitmaps are brought in via the 'Insert' option in the top of screen menu bar
Plotting colour images
Update June 2003 Allplan 2003 now has an excellent method for bringing in bitmap images to the layout editor. It uses OLE and so you need to have an application associated with the filetype you are going to import (e.g. jpg or bmp) that is capable of being an 'OLE server'.
Such applications are Windows Paint, Paintshop Pro and Corel Photopaint. It does not seem to work with Adobe Photoshop 7.1
Windows Paint will allow bmp files to come into layouts using 'Insert object' whereas the other 2 packages will allow jpg files to be imported. For quality output bmp files are bigger but better.
At last(!) images refresh quickly and plotting a mixture of vector and bitmap output at high quality is possible.
+ + +
Please email any comments or corrections
Return to Allplan FT Users Main Page