William
Sutherland
Architect |
| |
|
|
 |

Click
Here
to Return to
Allplan FT
Users Page 1
Office
Address Cluan
Rydal Road
Ambleside
LA22 9BA
015394 34489
For
location plan
see Local Links
|
 |
| Temporary
Switch Off bitmap... |
|
|
|
 When drawing over scanned images - and especially if you have forgotten
to put the vectors on a separate drawing file (!) it is useful to
be able to turn off the bitmap from time to time. There is an option
in 'Show/Hide' called 'Scan
element/ scanned image' which can be deselected. Also when
drawing over bitmaps I find that it is best to deselect 'Scanned
images on top' when drawing lines and to reselect it when
drawing with architectural elements (as below).
When drawing over scanned images - and especially if you have forgotten
to put the vectors on a separate drawing file (!) it is useful to
be able to turn off the bitmap from time to time. There is an option
in 'Show/Hide' called 'Scan
element/ scanned image' which can be deselected. Also when
drawing over bitmaps I find that it is best to deselect 'Scanned
images on top' when drawing lines and to reselect it when
drawing with architectural elements (as below).
|
|
|
|
|
 What a wonderful tool 'Modify Offset'
is - In addition to making walls thicker/thinner in 3D and moving
lines orthogonally in 2D it can also modify widths of openings in
3D - any smart symbol within the opening seems to resize automatically
(although if you have architraves added to the symbol frame they
do not move correctly).
What a wonderful tool 'Modify Offset'
is - In addition to making walls thicker/thinner in 3D and moving
lines orthogonally in 2D it can also modify widths of openings in
3D - any smart symbol within the opening seems to resize automatically
(although if you have architraves added to the symbol frame they
do not move correctly).
Now if it only worked in Elevation view!... :)
|
|
|
|
|
 It is sometimes useful to be able to hide the lines around walls.
The 'Show/Hide Junctions' tool prompts
you to point to lines you wish to hide. Click again on the same
line for it to reappear, or any modification to the wall will cause
the line to reappear (nuisance that!).
It is sometimes useful to be able to hide the lines around walls.
The 'Show/Hide Junctions' tool prompts
you to point to lines you wish to hide. Click again on the same
line for it to reappear, or any modification to the wall will cause
the line to reappear (nuisance that!).
|
|
|
|
|
|
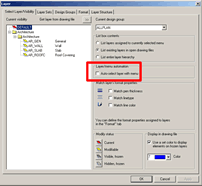
A
chance conversation with another user today revealed to me why layers
were no longer automatically assigned to components. The default setting
is 'off' - I'm sure it used to be 'on'
in version 16.0b - no matter, mystery now solved - just tick the check
box in the 'Format->Select, Set Layers'
as shown below. |
|
|
|
|
 When drawing circles, after specifying the radius you do not need
to specify '0' and then '360' when offered in the command line as
values - just click the centre point of the circle twice. This also
has the advantage that it resets the default values to 0 and 360
- handy if you drew some arcs previously since Allplan 'remembers'
the last settings.
When drawing circles, after specifying the radius you do not need
to specify '0' and then '360' when offered in the command line as
values - just click the centre point of the circle twice. This also
has the advantage that it resets the default values to 0 and 360
- handy if you drew some arcs previously since Allplan 'remembers'
the last settings.
|
|
|
|
|
If you Copy using the Allplan command from a drawing in edit mode 'behind' your active drawing
file then the copy stays within that original drawing file. Whereas
with the Copy via the Windows™ clipboard it Pastes to the
Active drawing file.
Thus you can now move or copy elements between drawing files without
'turning off' the destination file as long as both drawing files
are in either edit or active mode. You just need to use the right-click
option 'Activate Drawing file' on an
element within the edit mode file to make it active (the title bar
gives the currently active drawing file).
Incidentally I have only just discovered the
delights of the 'Copy and Show Target Drawing
File' option from the 'Copy/Move Elements
between Files' tool. It opens another window on the destination
file.
|
| Copy
or backup Layers ... |
|
|
|
It
seems to say in a recent FAQ
that you can copy a Layer structure between projects using Windows™
Explorer. This sounds a bit risky to me but if you ever feel the
need to do this then the files involved are in the 'prj' subdirectory
for your project (the project number appears in the title bar of
Project Pilot when you highlight the project in the list or you
can use the Hotline tool in the Services application).
The relevant files are (note the 'wildcard' asterisks):
layerdef.dat
lbginfo.dat
lba00*.dat
lbd00*.dat
lpainfo.dat
lpa00*dat
|
|
|
|
|
If you delete
a segment of a line which passes through a block of text Allplan trims
to an invisible box around the text if you point to inside the text
block. |
| Using
a tablet with Allplan... |
|
|
I
notice there is a recent FAQ
at www.nemetschek.de about using a tablet with Allplan. I use
a Wacom Intuos A3 tablet all the time with Allplan - it comes with
a 3 button pen and 5 button cordless mouse. The pen seems to work
most comfortably in 'pen' mode rather than in 'mouse' mode and you
can set it differently for each application - you can even have different
pens and the tablet senses which one you are using! Although it does
not work as a true digitiser within Allplan you can trace over bitmaps
brought into Allplan which I find quite adequate. The 'Alt+click and
Alt+Shift+click' commands for drawing freehand lines work quite well
with the pen.
Addendum for Cinema 4D use - if you use a Wacom
tablet with Cinema 4D be sure to
check the 'Graphic Tablet' option in
'Edit->General Settings' or objects
will travel around the model view at warp speed completely out of
control. |
| Autodock
floating toolbars... |
|
|
On
a hunch I just tried something I discovered by accident in Plandesign
FT 2.5 - and yes, it also works in Allplan!
If you double click on
the title bar of a floating toolbar it will automatically fly back
and dock itself. It seems to 'remember' the last docked position.
|
| Smart
fit - Modify...what region? |
|
|
 Use 'Modify Region with Placed Ele.'
to cut a hole within, or add a bit to, a region created using the
'Smart Fit' module (the simplest way
is to Right-click on any Region and select it from the shortcut menu).
Use 'Modify Region with Placed Ele.'
to cut a hole within, or add a bit to, a region created using the
'Smart Fit' module (the simplest way
is to Right-click on any Region and select it from the shortcut menu).
Note: Allplan asks you to 'Select region'
after clicking this tool button, however - unlike the delete region
command - if you click within a region nothing happens - you must
click the boundary of a region for the tool to identify the region.
Thereafter you can add or subtract areas to the origjnal region. ('Esc'
to finish outlining areas and 'Esc' again
to implement). If things go awry check that the 'Outline
autodetect' toggle is off and try only snapping to points or
intersections rather than 'element snap'.
|
| Smart
fit - Check current pen... |
|
|
  If you make any modification to a smartfit region - say by stretching
it - check the current pen as the Smart Fit tool automatically redraws
the revised region but in the current pen - not the one it was drawn
in.
If you make any modification to a smartfit region - say by stretching
it - check the current pen as the Smart Fit tool automatically redraws
the revised region but in the current pen - not the one it was drawn
in.
|
| Shortcut
keys for layer states... |
|
|
Once
the layer selection dialogue is brought up by Ctrl+4 or from the 'Format'
menu there are some key combinations which set the states of layers
- I have not quite worked out the logic of this but the keys are:
Shift + a,
w, v and
u.
|
|
|
|
 Yet another thing that I have just discovered but is probably widely
known (somewhere!)... you can rotate a symbol while it is on the end
of your cursor awaiting placement by pressing the
'+' or '-'
keys - the degree of increment of the angle is set by the angle
specified at the right hand end of the dynamic toolbar... excellent!
Yet another thing that I have just discovered but is probably widely
known (somewhere!)... you can rotate a symbol while it is on the end
of your cursor awaiting placement by pressing the
'+' or '-'
keys - the degree of increment of the angle is set by the angle
specified at the right hand end of the dynamic toolbar... excellent!
Allplan 2004 - [Advanced Point Entry active] this needs an extra click - to enable such rotation you must first click in the box as shown here.. then the plus and minus keys will work again...

|
|
|
|
Allplan
seems to lack a horizontal or vertical 'lock' when copying or moving
2D plan and elevational elements. To get round this I draw a long
horizontal construction line at the bottom of the screen and a vertical
one at the side. If 'element snap' is switched on (and cursor tips)
then after highlighting the elements to be moved you can snap to one
of the aforementioned construction lines and have a freely movable
selection which you can keep in alignment by snapping to the same
construction line, double right-clicking to reselect the same selection
if further positioning is needed and repeat as often as needed.
Update
May 2003 - in Allplan
2003 - hold Shift key to keep horizontal or vertical when moving
objects.
|
|
|
|
there
are 4 control points on a single line of text - one at each unseen
'corner' of an imaginary box around the text - but the one on the
bottom left is the only one that responds to being included in a selection
rectangle. This is still true even if the text is mirrored - (very
tidy programming). You can free rotate text just as with any object
in Allplan by invoking 'rotate' and then clicking one control point
for the centre of rotation and then another point but Truetype fonts
only show characters in outline while being moved/rotated up to about
35 characters. This limit does not seem to apply to 'traditional'
vector fonts (numbers 1-20).
|
| View
tools nearer to hand... |
|
|
further
to the previous entry on hotkeys and toolbar customisation ...
at high resolutions e.g. 1280 x 1024 and greater I find that the standard
viewing tool icons are a bit small - one solution is to tick the option
for 'large icons' in the 'Tools->Customise'
->'Toolbars' tab after highlighting 'Window'
in the list but this still leaves the icons docked to either the very
top or very bottom of each window. A better method - at least for
me - is to create a new toolbar - click 'New...'
on the previously mentioned tabbed dialogue and drag & drop copies
of the icons from the 'Customise' tab
with the 'Window' option highlighted
in the drop down list box onto your new blank toolbar (or you can
add them to an existing toolbar). This gives standard sized icons
on a toolbar that can be docked any side of the screen or left floating.
You just have to remember to click in a window before using it if
you have a multi-window setup (which applied to the standard setup
too as often as not). Remember to 'Save' before closing the customisation
dialogue - this makes your toolbars pretty much 'bombproof' - defying
even a complete uninstall/reinstall of Allplan!
|
| Hotkey
entries extended?... |
|
|
in
v16.1 and onwards there seem to be more options under 'Tools->Customise'
to assign hotkeys. Some of the
top menu bar commands are now available for hotkeying. Anyway -
... now you can assign
hotkeys to 'Previous View' ... and 'Next View' - they are in the first
tab of the 'Tools->Customise' dialogue
- drop down the Categories list box and
click 'Window' - click on the appropriate
icon on the right - check the description at the bottom of the dialogue
- click in the 'Press new shortcut key'
empty entry and press the desired key - some are already defined.
While in 'Customise' I notice that in the other tab of the dialogue
there is now an entry called 'Window' - unchecking this removes the
bottom (or top if you have used the option to shift it as I have)
toolbar containing the zoom functions.
If you really want to maximise the screen area try using 'View->Full
Screen' - a bit scary but encourages use of the hotkeys which
is quicker than picking buttons. (Click the icon in the bottom left
corner to return to normal screen mode). |
Top of Page
Home
¦ Park
Issues ¦ Services ¦ Local
Links ¦ Technical Section
Allplan FT Users Page 1
|