| |
Basic
setup tips...
applies to most versions |
| If
you use a Graphics tablet... |
go
into Edit-> Preferences-> Common
If you use a graphics tablet (as I do) then you probably need
to check this option - certainly with the Wacom tablets - or
objects will move too fast to control. 3DFluff have posted a script by Matthew O'Neill which allows toggling of tablet mode |
| OpenGL
can be enabled |
go
into Edit-> Preferences->Viewport
If you have a good graphics card with more than 16Mb of onboard
memory then try selecting the OpenGL shading option - if your OpenGL
driver is not up to it (most Nvidia chipped cards seem to work
OK) this is immediately obvious and you can uncheck the option.
Also try the 'Antialiased lines' option - much pleasanter on
a large screen monitor. In fact try ticking ALL the OpenGL options - they all work OK on my PNY Quadro FX2000 and FX 3000 cards but some options remain 'greyed out' with less powerful cards.
However DO read the relevant section of the online manual - some fascinating insights into graphic
acceleration. |
Customise
colours..
enable bubble help.. |
go
into Edit-> Preferences->Interface->Colors
Also Edit-> Preferences->Viewport->Colors
for me the grey background it just too depressing and so I lighten
up the default settings by pushing the sliders along a bit in
the 'Color' option. Note that you
can change the colours of everything in C4D (if you really must
- the 'interface' tab is also full of dubious delights - you
can texture the menu bars - or even give them a Mac OSX look)
Enable Bubble Help in Edit-> Preferences->Interface |
| Texture
paths |
go
into Edit->Preferences
click the 'Texture Paths' tab and
use the browse buttons to navigate to at least your Allplan
\Data Files\Nemetschek\Allplan\Std directory
- you can add others later as appropriate. If you do not do
this you will find that C4D will not be able to locate textures
on models imported from Allplan and you will see an error message
when rendering. |
| Reset
layout
to default |
C4D
is so configurable that you can quite easily mess up the default
toolbars and window layouts by accident (I do it all the time)
-
this is why the 'Save Layout at Program
End' option is not enabled by default - however if you
have checked this option and messed things up to reset everything
back to the default arrangement go to 'Window->Layout->Reset
Layout' |
| No
context sensitive help |
C4D
does not have a context sensitive (standard MS windows type)
'Help' system - i.e. pressing 'F1'
does not bring up a context Help file. Help consists of an Acrobat
format file - and you cannot access help until you exit from
the menu or whatever you are puzzling over - Ho Hum. That said,
the online guide is excellent with good cross referencing and
masses of useful and interesting information. Use the Search
options within the Acrobat reader to locate topics. |
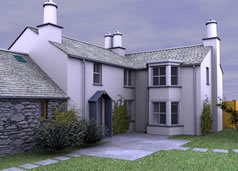
| Setting
up + Saving a rendered image |
Rendering
is more complex than in Allplan because of the high-end features
available - even to output a default rendering takes a bit of
working out. The simplest method I have found using default
settings is to click on the middle button (of 3 in top of screen
menu bar) with the 'vase' icon (if you click and hold on it
a range of options appear) which renders the current view to
a new window... on this new window menu bar click 'File->Save
Picture as...'
To control all the render parameters use Ctrl+B or 'Render->Render
settings'.
Don't be put off by the mass of options, just work through
the headings and only change things you understand (!) - like
save in tif at 96 dpi or whatever rather than in the default
targa format.
Note that this dpi setting makes no difference to the actual saved resolution - it is used by programmes like Photoshop to decide what resolution the image was created at.
For the bits you don't understand, get out the online manual
and read up on the options - it takes time but eventually you
will get the hang of the Radiosity and other settings.
Here is an excellent tutorial on Radiosity in C4D or buy the excellent 3DFluff DVD tutorial on radiosity and interiors |
| Remove
duplicate textures |
Prior to version 2003 Allplan brought in the same texture more than once and so
one of the first things to do after importing a model from Allplan
that contains textures to C4D is to click 'Function'
in the Materials Manager (bottom of the screen by default) and
then click 'Remove unused materials'
and 'Remove Duplicated materials'
Note -this has been fixed in v2003 of
Allplan.
Even in v2005 of Allplan all objects come in with a 'Phong' tag and material properties including reflection, transparency, specular and sepcular color. Double click on material ball and then draw a box by clicking and dragging with the mouse or pen through all the balls of materials at the bottom window of the interface which selects them all and then Ctrl+Click those materials you do not wish to change - then untick those options from the material properties dialogue which will then clear the settings for all the materials selected in the Material Editor. |
| Which
way is up, please? |
the
XYZ axes are different in C4D to Allplan - in CAD X and Y are
right and up in plan view and Z is up in 3D views. In C4D X
is right and Y is up and Z is into the 'page' or screen - historical
differences I guess. |
|
Where
has my model gone?
Initial
scene
setup...
|
Upon import to C4D from Allplan it is quite likely that you
cannot 'see' your model - try pressing 'H'
on the keyboard or on the actual window 'View'
menu - 'Edit->Frame scene without camera/light'.
Press F5 for a multiple window
view and then click and then press 'H'
in each window to centre the model or Alt+H does it all in one go.
It is useful to double click on the Camera that came in from
Allplan in the list of objects (on the right-hand side of the
screen - click the + sign to expand
the list of objects) and call it 'Allplancamera'
or similar, and then create a new target camera from the Objects->Scene->Target
camera and assign the top left Viewport to show the view
from this new camera via the menu item on this viewport Scene->Scene
cameras. (You should see 2 cameras listed - the Allplan camera
and the new one).
Set up like this you can click on the newly created camera
in the list of objects (top left of screen by default) and move
it with the mouse using left-click and drag anywhere in each
window (by default Move tool enabled)
and since it is a Target camera the Target
can also be move about to change where the camera is pointing.
It is important to realise that the top left view (if all views,
F5 , turned on) is the one that
is rendered either within itself or separately in the render
window which opens when you click on the the middle render icon
(with default setting). Note also that when you create a new camera the view attached to it defaults to the current view before creating the camera. Thus it is simplest if the perspective view is the current window when creating a new camera.
You can choose another window as the choice for output by clicking
on the Edit menu item on the particular
viewport menu bar and selecting 'Use as
render view'.
It takes a bit of getting used to but it helps to explore
the menu bars on the viewports for options rather than the top
level menus.
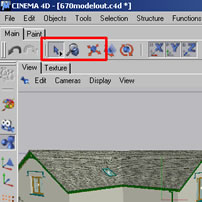
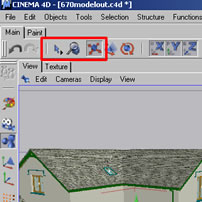
You can make the menu icons on the top bar smaller or larger
by right-clicking on the menu bar and clicking on Icon
Size...
On my monitor I normally have them set to Medium rather
than Original size. |
| Walk
before you run... |
take
your time to understand the basics - you have to walk before
you can run - there are excellent free tutorials available for
download on the www.maxon.net
sites and via third parties like the 3DFluff .com DVDs mentioned above.
|
| How
do I close an open file? |
If
you have several files or 'scenes' open at once, to close one
you have to use 'File->Close'
or use Ctrl + F4... there is no
little cross in the top right of the application window as you
would find in standard Windows applications... |
| If
the active object is hard to see |
In
the active window go into 'Edit->Configure...'
- top right of the resulting 'Configure
Viewport' pop-up has options for 'Inactive
Object' - try setting this to 'Wireframe'
or similar and leave the 'Active Object'
setting as Gouraud Shading. This will leave every object apart
from the one selected as wireframe.
Note that you can also turn off objects using the little grey
dots in the object manager or the tick mark next to them. |
Units in C4D and
in Allplan |
UK construction practice is to work in millimeters - if you want the dimensions to be the same in Allplan as in Cinema 4D then set the Units in Edit->Preferences to Centimeters in C4D.
Scale conversions for import / export are provided but I find this makes life easier.
For some reason Dosch objects I find always come in to C4D 10 times too big and need to be rescaled |
| |
|